Managing Alias Domains
An alias domain is used to redirect a domain that you do not have an active website for, to a domain that does. You can use your cPanel for managing all your alias domains.
For example, you may have purchased several tlds of your domain name such as example.com, example.org, and example.ninja (it’s real, trust me). Instead of using your addon domains for these extra tlds, you can set them up as aliases of the primary domain. This way, any traffic for the alias domains will be redirected to your main domain website.
Here is a guide to help with adding managing your alias domains.
Create and manage your Alias domains
In order to add an alias domain, you will need to log into your cPanel. You can find a guide on how to access your cPanel here.

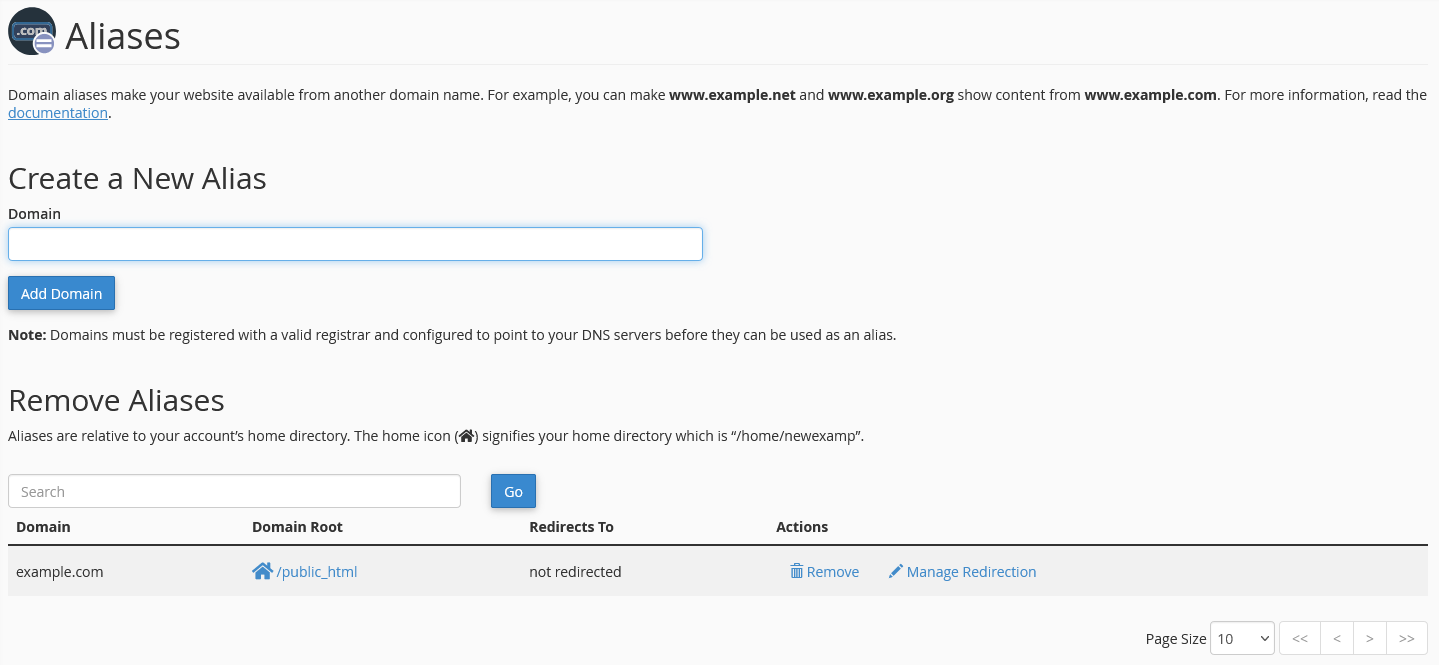
Once logged into your cPanel, scroll down to the Domain section and click on the Alias Domains app

Adding a domain alias is as simple as entering it in the Create a New Alias field and clicking on Add Domain. You will need to make sure the the domain DNS records are pointing to our servers, either by updating the domain name servers or updating the domain DNS zone file.
Adding a domain alias will create a zone file for that domain.
In the Remove Aliases section of the page, you can see several sections with some management options.
- Domain
- this is the name of the Alias domain
- Domain Root
- this is the Document Root for the alias
- this cannot be edited
- clicking the link will open the File Manager
- Redirects To
- shows the redirection target
- by default will direct to the primary domain (not directed)
- Actions
- Remove
- Delete the Alias domain
- removes the zone file as well
- Manage Redirection
- click here to edit the redirect target
- Remove
Propagation
Note: It can take up to 24 hours for any changes or updates to your domain name and DNS to fully propagate and take effect. During this time your website traffic and email may be disrupted. If you want to minimize this disruption to your website traffic and email, before making any other changes to your name servers, lower your TTL with your current registrar. Once you lower your TTL, wait 24 hours, and then update your name servers. The change should now happen more quickly.
There are several online tools that you can use to test propagation, such as DNSChecker and Geopeeker.
This process typically completes within four to six hours, but allow 24 hours before the records are fully propagated.
If you are still having issues, and need further support, please reach out to our support team using any of these methods.
Recent Articles
What is Cloud Hosting
You probably have heard a lot of buzz around the internet about "the cloud". But what is the cloud that everyone is so excited about, and what does it have to do with your [...]
Website Builder Contact Forms
A Contact Form can be a powerful online tool to help build your business client base and add new customers.
Website Builder Site Settings
Use the Site Settings section of your Website Builder service to customize your new website.
Create your new website with Website Builder
Create your new website for your new business using our new Deluxe Hosting Website Builder service

