FTP Clients – FileZilla
FileZilla is one of the most popular FTP clients out there that works will most operating systems. With its ease of setup and use, as well as a full suite of advanced tools, FileZilla is a great tool for both people new to FTP and web hosting, or the most seasoned web site veteran.
Here is how to start using FileZilla with your cPanel based Deluxe Hosting web hosting services.
Before you start
Before you can start using FileZilla to upload your web site files, there are a few things that you will need first.
First, you will need to create an FTP account in your cPanel. You can find information on creating FTP accounts here. Make sure you know your FTP settings:
- Host name
- Username
- Password
Once you have your FTP account all set up, you will now need to download and install FileZilla. See the section below for the installation method.
Now that you have your FTP client and your account all set up, you will need files to upload. While we can assist in many facets of your web hosting services, unfortunately this is one part we cannot assist you with (for now). There are many apps and programs available to help you build your web site. You can even search your local classifieds to find someone who can create a website for you for a reasonable price.
Download, Install and Set up FileZilla
In order to use FileZilla to upload your files to our servers, you will first need to install the app and then set it up with your FTP account settings.
Download and install FileZilla
First, you will need to download the FileZilla client installer. This can be found at their website:
https://filezilla-project.org/download.php?type=client
The correct version for your OS (operating system) should be selected by default. Click on the Download button to begin downloading that version to your local machine. You may get another screen with options to download the free version or any of the paid options. The free version is fine for what we need it to do.
Once downloaded, find the file and run the installer. The default settings should all be fine. After the app is installed, open the app to begin setting it up to connect to your web server.
Set up FileZilla

Now that you have opened your new FileZilla installation, you can now set it up to connect to our servers. There are two methods to achieve this.
Method 1 – The Quick Connect fields

If you look along the top of the screen, you will see the Quick Connect fields where you can enter your FTP account information.
Enter in your FTP credentials here and then click on Quick Connect to connect to to you web hosting server. You do not need to enter the port number, FileZilla will use 21 by default.
This method is great if you only have one or two servers that you connect with and don’t mind entering the information each time.
Method 2 – The Site Manager
If you manage several different websites using FTP, you will want to use the Site Manager. This will save all of your log in credentials for quick access to all of your different servers.

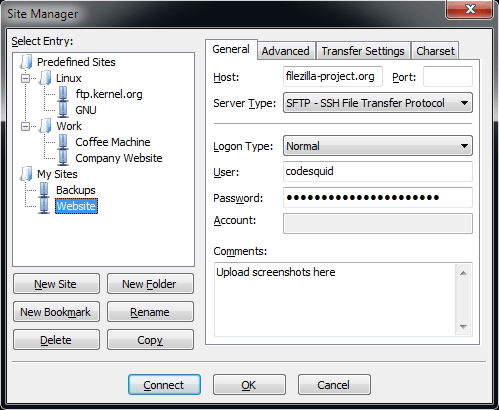
Clicking this icon will open the Site Manager. From here you can organize all of your different FTP accounts.
FileZilla will remember all of different sites host names and usernames for you. It can store your passwords as well, but you will need to create a master password that you can then use to log into all of your accounts. This is to encrypt and protect the server passwords.

On the left-hand side, you will see all of your saved passwords. You can create folders to help you keep them organized. Below the structure tree you will see six buttons:
The right-hand side shows you the credentials for the currently selected entry. There are four tabs of information, although the first one is the main one you will need to use.
Here is where you enter most of your credentials.
- Protocol
- here you will choose which protocol you wish to use
- this is typically be FTP – File Transfer Protocol
- Host
- this is the server name or host name
- typically ftp.[your domain name]
- Port
- port is 21 for FTP protocol, 22 for SFTP
- Encryption
- “Use explicit FTP over TLS if available” should be used
- Logon Type
- “Normal” should be used
- Username
- your FTP account username
- Password
- your FTP password
You can also choose a background colour or add a comment to the site if you wish, these are optional.
On this tab you can set any advances connection settings and defaults.
- Server Type
- “Default (Autodetect)” should be fine
- Bypass Proxy
- leave this unselected
- Default directories
- here you can set what local and remote directories to open when first connecting to the server
- Use synchronized browsing
- this tool is helpful when you have similar file structures on both your local machine and the remote server, such as a website
- when checked, navigating to a folder on one side (local or remote) will also navigate to the folder on the other side
- this can make navigating and updating files easier
- Directory comparison
- when checked, FileZilla will highlight differences between local and remote folders
- Adjust server time, offset by:
- this should be left as set by default
Under Transfer Settings, you can choose the Transfer Mode and whether to limit the number of simultaneous connections.
- Transfer mode
- should be left at Default
- if having issues, set to passive
- Limit the number of simultaneous connections
- you can leave this unchecked
In the Charset tab, you can set what character set you are using for your files. In most cases, you will want to use UFT-8. If you do not know what a charset is, it is most likely UFT-8.
- The server uses the following charset encoding for filenames:
- Autodetect should be fine in most cases
- you can also choose Force UFT-8 if having issues
- if you are using a different charset, you can select Use custom charset and then enter the charset in the Encoding field
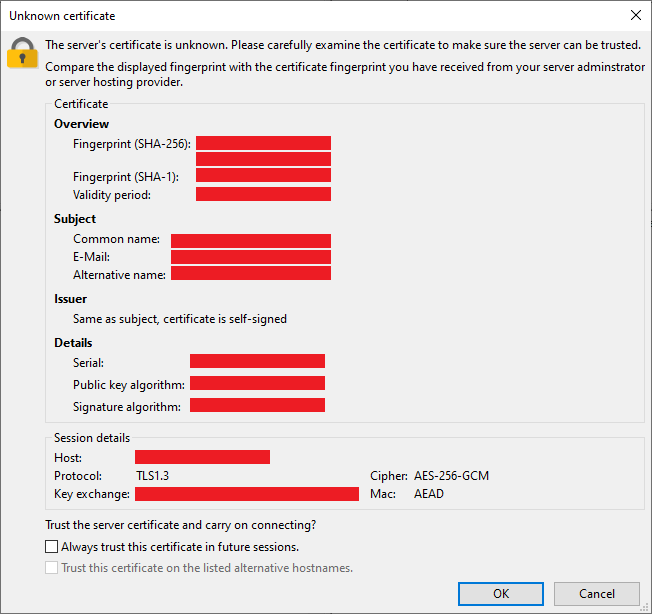
There is a good chance that you will get an Unknown Certificate warning if you used your own domain name in the Host name field. This is because the software is seeing the server certificate for our server name when connecting and not your domain name. It is safe to continue anyway by clicking on OK.

You can check the box that states “Always trust this certificate in future sessions” under the “Trust the server certificate and carry on connecting?” section to stop this warning from popping up each time you connect to the server.
You should now be connected to your web server. You will see two panes at the bottom of the screen. The left pane will show your files on your local machine. The right pane will show the files on your server.
Using FileZilla to transfer files

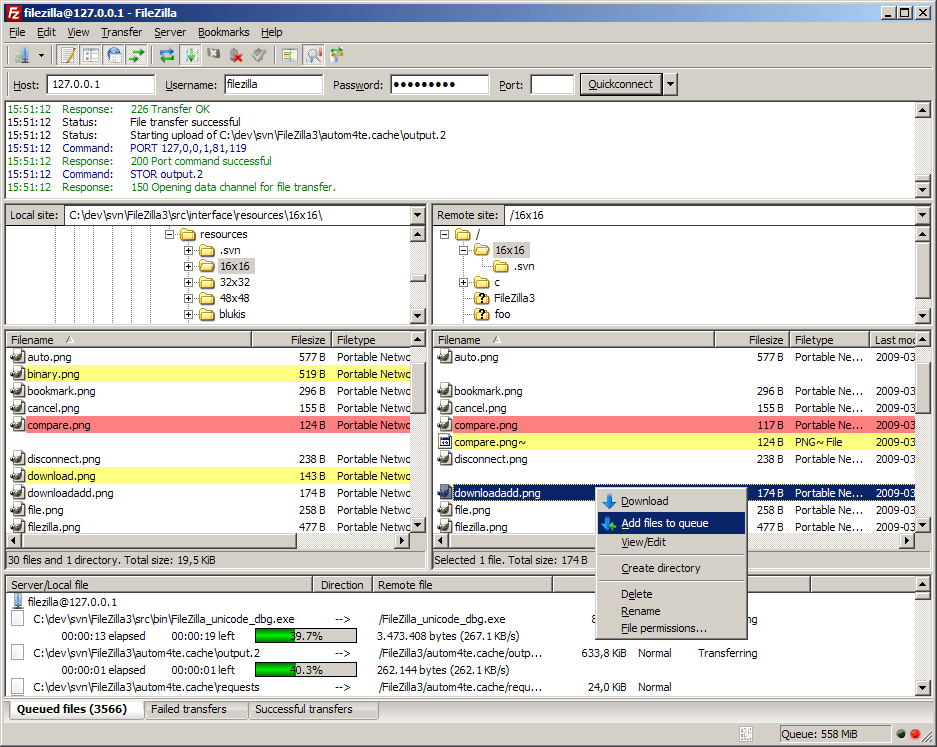
There may be a lot of information on this screen, but transferring files using FileZilla is an easy process. The main part of FileZilla is divided into four sections:
- Status feed
- Local machine files and folders
- Remote server files and folders
- Transfer queue
Status Feed
Along the top of the screen, you will see the status feed. Any changes or errors will show up here.
Local Machine Files and Folders
On the left-hand side, you will see the files and folders on your local machine (the computer you are using to connect to the web server).
At the top of this section, you will see the folder structure of your local machine. Click on the arrows to the left of each folder to expand or contract the sub-folders. Clicking on a folder here will open it in the file view below.
In the lower section, you will see the files and sub-folders in the currently selected folder. You can also navigate here by clicking on sub-folders, or clicking on the “..” sub-folder to go up one level.
Remote Server Files and Folders
On the right-hand side, you will see the files and folders of the remote server (the server you connected to).
At the top of this section, you will see the folder structure of your local machine. Click on the arrows to the left of each folder to expand or contract the sub-folders. Clicking on a folder here will open it in the file view below.
In the lower section, you will see the files and sub-folders in the currently selected folder. You can also navigate here by clicking on sub-folders, or clicking on the “..” sub-folder to go up one level.
Transfer Queue
The Transfer Queue shows the progress of any current file transfers and lets you know which, if any have failed transfer. You can queue up many files, but the server may only let you actively transfer a few at a time. The Transfer Queue will allow you to see the status of your transfers quickly.
Transferring Files
While there are several ways to transfer files, the easiest is to simply drag and drop. You can select either individual or several files and folders from either side and drag them into the other side. This will add the files to your transfer queue.
You can also right click on any file or folder and select Upload or Download from the drop down menu to start transferring the files. This will place the files to the currently opened folder on the other side.
If you are currently transferring files, you can select Add files to queue to add the files to the bottom of the current queue.
What else can I do?
When right-clicking on a file, you will see that there are several options for managing your files.
If you are still having issues, and need further support, please reach out to our support team using any of these methods.
Recent Articles
What is Cloud Hosting
You probably have heard a lot of buzz around the internet about "the cloud". But what is the cloud that everyone is so excited about, and what does it have to do with your [...]
Website Builder Contact Forms
A Contact Form can be a powerful online tool to help build your business client base and add new customers.
Website Builder Site Settings
Use the Site Settings section of your Website Builder service to customize your new website.
Create your new website with Website Builder
Create your new website for your new business using our new Deluxe Hosting Website Builder service

