
Create your new website with Website Builder

Now that you purchased your new Website Builder service, Accessed the service and completed the Onboarding Wizard, you can get started building you new website. Our Website Builder is easy to use and can get your website up and running quickly, but is robust enough to create a website that will grab some attention and stand out from your competition.
We can not go over every aspect of the Website Builder in this guide, but we can give you the basics that will get you up and running.
Switching between Preview and Edit modes
While you are building your new website, you will be able to switch the Website Builder between the Preview and Edit modes using the button in the upper right-hand side of the screen.
Preview Mode
When you first access your Website Builder, you will be in Preview mode. This mode, as you can probably guess, will allow you to preview how your site will look when published.
- At the left of the Preview bar, you will see and indicator showing which device mode you are currently in
- You can switch the device type using the Device buttons to the left of the Edit button.
- Switch between:
- Desktop
- Tablet
- Smart Phone
- Clicking the Edit button will switch you to Edit mode, where you can customize your website,
- The Published button will show whether the current version of your site that is being previewed here is published or not. Changes will not show on your live site until published.
Edit Mode
The Edit mode is where you we spend most of your time creating your Website Builder website. In this mode, you can edit any existing elements or add new ones. You will see many new toolbars and options show up in this mode, but don’t worry, we will walk you through how to navigate the Edit mode. But first, lets take a look at the Edit mode top menu bar.
- Page Settings
- Here you can edit your Page Settings, see below for more information.
- Add Page
- Allows you to add a new page to your website, up to your plan maximum
- Undo/Redo Arrows
- Use these Arrows to correct any changes that were made in error
- Preview
- This will switch you to Preview Mode
- Publish
- Use this button to push your changes to your live website
- None of the changes that you make here will show on your live site until they are Published
- From the drop down menu, you can choose whether to publish your entire site, or only the current page
Page Settings

You can update the settings of the current page in this section. There is a lot of information in this section and it is divided into several sections. Click below to find more information.
In the Page Settings section, you can enter the Page Name and upload a Page Image. You will also see the Page Size here.
Under the More Options section, you can edit several items:
- Page URL
- this will auto populate, but can be changed
- Page Title
- enter the page title here
- Page Keywords
- enter any meta data tags here that will help search engines find and server your page
- Description
- you can enter a brief description of the page help
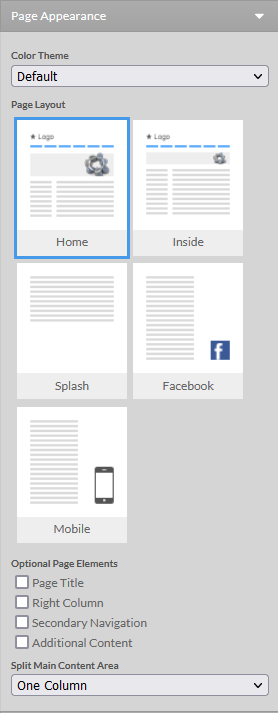 You can choose the general layout of your page in this section, including the color theme. There are several layouts to choose from.
There are also a list of additional elements that you can add to the page to further customize your page.
Finally, you can choose the amount of columns that your page will have.
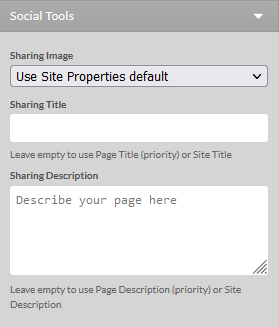 In this section, you can set the Image, Title and Description that will be used when sharing the page on social media. You can choose to use the default settings for your site, or use a specific Image/Title/Description for each page.
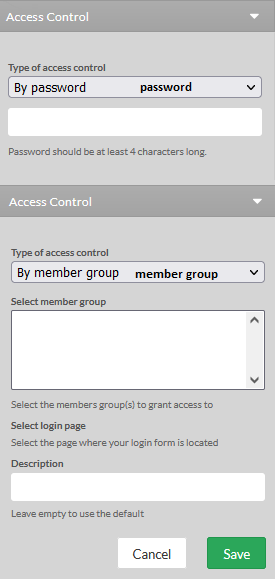 Control access to your page using one of three options:
- None
- Password
- Member Group
If using the Password option, you will need to set the password here. Your users will need to enter this password before the page will load.
To use the Member Group option, you will need to have set up a member database with a page for registration and managing users. This also requires the Pro or E-commerce plan. You can find more information on this process here.
Left-hand Menu – Elements
On the left-hand side of the screen, you will find your Element menu. Elements are the blocks that make up your website. They also assist with making your website responsive to different devices and screen sizes.

This is the main part of you Website Builder and is divided into two sections.
Elements and Add-Ons
The Elements and Add-On elements are are the building blocks of your website. Clicking on any of the top three icons will expand the menu of elements contained within. Once you find an element you wish to use, you simply need to drag the element onto your website.
Page and Site Options
In the bottom part of the menu, you will find several tools for editing and managing your website.
Elements

As mentioned before, elements are the building blocks of you website. Whether you are looking to add a text box, image, slideshow or anything else, you should find it in the Elements menu. While there are too many elements to go over all of them here, luckily they are divided into categories. Most of these are fairly self explanatory.
- Text & Images
- Layouts
- Container Elements
- Table & Lists
- Gallery
- Buttons & Shapes
- Forms
- Business Info
My Add-Ons/Add-Ons

Add-Ons, when it comes to Website Builder, are essentially special elements, that can be used for extra functionality. But what is the difference between My Add-Ons and Add-Ons?
At one time, there were some premium Add-Ons that were a paid option. But now, all Add-Ons are now included with your subscription. While some of these add-ons are activated by default, others will need to be activated in the Add-Ons section first. Once activated, you can drag them to your site from your My Add-Ons section.
Pages

This section will allow you to manage all of your website pages. It is also where you manage your navigation menu.
Add Folder/Search
First, at the top of this section, you will see the Add Folder button. Folders in the Pages section will create sub menus in the navigation menu. There is also a Search Bar here if you have a lot of pages on your site.
Page List
Below the Search Bar, you will see the list of pages. To the right of each page, there may be several icons. If you hover over a page, you will see all of the potential icons. Clicking on the icon will toggle that setting.
- Publish
- Click this icon to publish the page to the live site
- 404
- You can set a page to be the 404 page for your site. A 404 page is the error page that shows if there is a missing link or other site error
- Move page
- Use this icon to move this page into a folder, creating a sub menu. This is great for organizing large sites.
- Duplicate
- Create a exact copy of the page, great if you have several similar pages (product pages or staff pages)
- Home Page
- Click this to set this page and the Home page, the first page that loads when visiting the site.
- Page Settings
- See above for more information regarding the Page Settings.
- Delete
- Delete the page. Be certain that you wish to delete this page, as it may not be recoverable.
Redirects
You can add a page here or manage any existing redirects.
Design

The Design section is where you can change your Theme. When you select Design, you will be able to choose a category of themes and preview any of the themes that are available. You can view your site without affecting your existing website, and revert to your original theme if you wish, so take a look around.
Customize

In the Customize section, you can change your color palette for your Theme. Once again, feel free to try them out, you can always go back later.
Site Settings

Here you can manage your domain and website settings.
Because of the amount of functionality found here, we have created an article for this section. You can find it here.
Help
The Help section will open the First Steps section from the Onboarding Wizard. Here you will find several videos and articles that will help you out if you get struck.
Right-hand menu – Element Options
The menu on the right hand side only shows when you have an element selected. This menu will now show the options and settings that are available for that type of element. These options are specific to the element.
This example is for the Contact Form element.

Adding Elements to your site
Adding new elements to your website is as easy as dragging them from the menu onto the preview of you website.

When you select any element from the menu, you will see the drag anchor at the top of the element. Click and hold this and drag the element onto the preview of your website.
While you are dragging the element, you will see bars that indicate any of the possible locations for the element. The location of these bars are determined by the current layout and theme. This helps with keeping your site responsive to different screen sizes.
Once you have the element where you want it, release to place it.
You will see options for the element on the right-hand menu. These options are different depending on what type of element you are adding.
Managing Elements
When you have any element selected, you will see this boarder around the element.
You will see the anchor tab at the top-center of the element. You can use this to drag the element to a new location on the page.
If the element you click on is a text box, you can click anywhere on the element and type to edit the text just like you would on any form. You will see the formatting options in the right-hand side menu.
This menu will change, depending on the element type, but should always contain the configurable options of the element. If this menu is in the way, click on the arrow button to hide it.
Finally, there will be icons on the upper right-hand side of the element. These icons may differ, depending on the element type, but there should always be the following:
- Delete Element
- Copy Element
- Hide Element from publishing
- Select Element
The use of these icons are self-explanatory for the most part. We will go over the clipboard (copy/paste) system below.
The Clipboard System
The Website Builder has a Clipboard system (like the copy, cut, paste system in most systems) that you can use to create commonly used elements. While you cannot use the typically shortcuts, this system is not difficult to use.
First, if you have an element that you wish to reuse, click on it to select it. You will see the icons show up on the right-hand side of the element (see above). Click on the Copy Element icon.

If it was not there already, you will now see the Clipboard menu in the left-hand menu. Below Clipboard, you will see the number of items currently in this section.
When you click on this menu item, you will see all of the elements that you currently have copied to the Clipboard. To add any of them to your website, you only need to drag them onto your page, just as you would any other element. You can then edit them as you see fit.
You can remove any item from your Clipboard by clicking on the trash can that shows up when you hover over the element, or you can clear your Clipboard by clicking the Clear Clipboard button.
If you are still having issues, and need further support, please reach out to our support team using any of these methods.
Recent Articles
What is Cloud Hosting
You probably have heard a lot of buzz around the internet about "the cloud". But what is the cloud that everyone is so excited about, and what does it have to do with your [...]
Website Builder Contact Forms
A Contact Form can be a powerful online tool to help build your business client base and add new customers.
Website Builder Site Settings
Use the Site Settings section of your Website Builder service to customize your new website.
Create your new website with Website Builder
Create your new website for your new business using our new Deluxe Hosting Website Builder service