Website Builder Contact Forms
A well crafted Contact Form on your website can be very effective for building your client base. Not only do they allow potential customers contact you with any questions or concerns, it gives you an opportunity to make a good impression on them and pitch your business.
Our contact form will take the information that your users enter and create an email that will be sent to your mailbox. What information is sent is customized by you.
You can build and manage a contact form in your Website Builder. Here is how.
Adding the Contact Form
Once you are logged into your Website Builder, you can add a contact form to your site. While you can add it anywhere, it is best practice to add it to a “Contact Us” page.
If you do not have this page created already, you can add a page using the Pages tool in your left-hand menu.
Once you have the page selected, you can create the contact form by dragging the element from the elements menu to the page. You will find it in the Business Info section.
Setting Up your Contact Form
When you drop your contact form onto your page, you will see the options load in the right-hand menu. Here is where you will set up your new contact form.
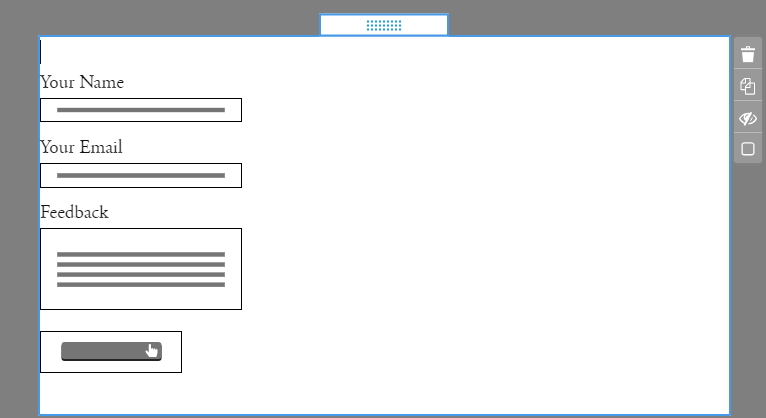
When you add a new form to your site, the default form will be added with four fields. These can be customize as needed, or you can remove them and add your own fields.
Form Options
When you have the contact form selected, you will see the form options on in the right-hand menu.
You can edit and add text to the form just like you would any text box. All of the standard text formatting tools can be found in the right-hand menu.
You can also add more form fields from here
 Single Line Text Box
 Multi Line Text Box
 Selection Box (multiple choice)
 Check Box
 Radio Button
 Feedback Field
 Messages
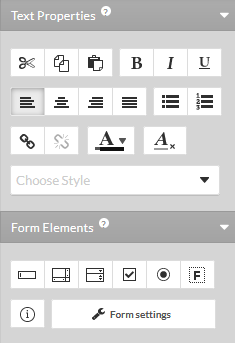
There is also a button here to access the Form Settings. We will go over these settings here.
When you select any of the fields that you have added to your form, you will see more options show on the right-hand menu.
There are some fields that will be on almost every item:
- Name
- the name of the field
- will be used when creating the email sent to the site manager
- Label/Placeholder
- text that will show in the empty field
- typically describes what information the field should contain
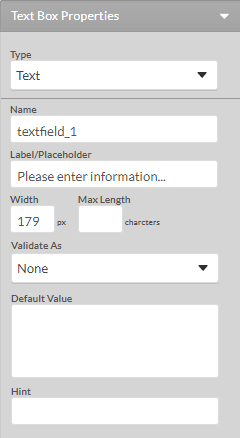
- Width/Height/Max characters
- limit the size/length of the field
- Validate As
- will validate that the information added matches what is expected by the form before it can be submitted
- example: input is in the format of a phone number or email address
- Default Value
- this will be entered into the form by default
- different then the Label/Placeholder, if not altered, this will be submitted
- Hint
- a message that will appear when the field is selected
Single Line Text Box
The single line text box will allow a one line entry with several types.
- Text
- a simple text field
- Password
- entry will be hidden with only dots showing to protect a password
- Hidden
- this field is hidden from the user
- can be used to add hidden information to the email
- File
- creates a prompt to attach a file to the form
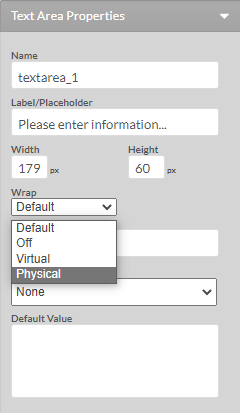
Multi Line Text Box
Allows for multiple lines to be entered into the form. The only special option here is the Word Wrap method.
Selection Box (multiple choice)
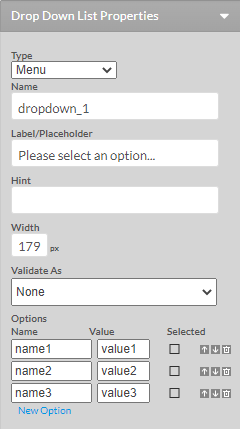
This field allows your users to choose from a list of predefined options. You can add as many as you need and assign a value to each. You can also choose which is selected by default.
You can choose between a drop down menu or a list in the Type field.
You can use the Validate As field to ensure that one option is selected.
Check Box
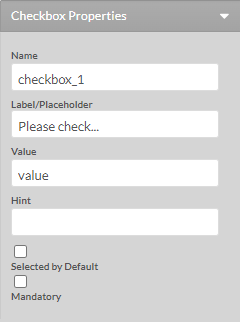
The Check Box is a simple True or False option. You can choose whether this box is checked by default or if it must be checked before the form is submitted.
Radio Button
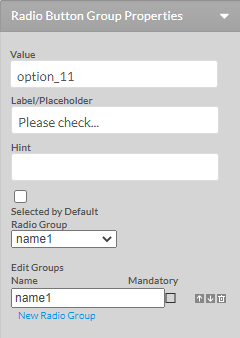
Similar to the Selection Box, the Radio buttons give your user several options to choose from. Selecting one option will deselect all the other options.
You can add several options and choose one that is selected by default.
Feedback Field
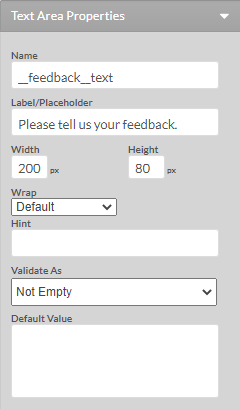
This field is identical to the Multi Line Text Box. You can choose the Word Wrap method here.
Messages
This field is not a typically field that your users will add information to. This simply defines the area where any messages regarding the form will be displayed (success, failure, missing fields, etc.). There are no options for this field.
Button Properties
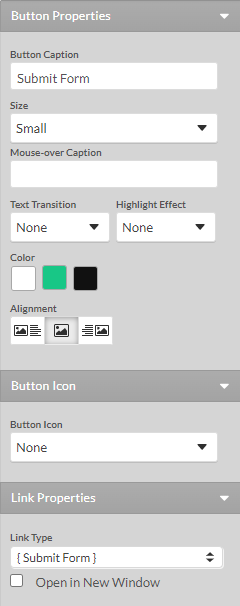
The most important part of your contact form is the Submit button. Without it, the form information will never get to you.
While most of these options are self-explanatory, we will go over them here.
- Button Caption
- the text that shows on the button
- Size
- choose the size of the button
- Mouse-over Caption
- text that shows when hovering over the button
- Text Transition
- adds animation to the button
- Highlight Effect
- add an effect when selected
- Color
- customize the color of the button
- Alignment
- set the location of the button
- Button Icon
- select the button icon from the list
- Link Type
- choose what happens when the button is pressed
- should be left as {submit form}
- Open in New Window
- this option will open the form submit results in a new window
Form Settings
Finally, we get to the form settings. In this section, you will manage the back end of the contact form. These settings are divided into three sections:
Next Page
These options will determine what page loads after a form is submitted.
- Link Type
- Select what page will load once the form is submitted
- can be set to stay on the current page, or link to any internal page
- Scroll to form on submit
- once the page reloads, the window will scroll down to the form
- Success message
- the message that will be displayed on a successful form submission
Send to Email
Now, you will need to choose what email the form will be sent to.
- To Email
- the target mailbox for your form submissions
- ideally, this mailbox would not be used for other mail
- From Email
- the address that the form emails will be sent from
- to keep from getting flagged as spam, this cannot be changed
- Mail Subject
- the subject that is added to any emails from the contact form
- this can help with sorting and filtering
Send Confirmation Email
You may wish to send a confirmation email to your users when a contact form is submitted. These settings are hidden by default. Toggle the switch to enable this function.
Once enabled, you will see the options available.
- To Email
- select the field from your form that will be used as the target email address
- this is why validation is important for email fields
- From Email
- same as above, this is the email the confirmation email will be sent from and cannot be changed for spam reasons
- Mail Subject
- the subject line of the confirmation email
- Mail Format
- choose the mail format
- select either Plain text or HTML
- Template
- create the body of the email that will be sent to your users upon a successful form submission
- can be either plain text or HTML coding
Once you are happy with your settings, be sure to click on the Save button in the lower right-hand side to update your site. Once you publish the changes, you contact form will be active.
If you are still having issues, and need further support, please reach out to our support team using any of these methods.
Recent Articles
What is Cloud Hosting
You probably have heard a lot of buzz around the internet about "the cloud". But what is the cloud that everyone is so excited about, and what does it have to do with your [...]
Website Builder Contact Forms
A Contact Form can be a powerful online tool to help build your business client base and add new customers.
Website Builder Site Settings
Use the Site Settings section of your Website Builder service to customize your new website.
Create your new website with Website Builder
Create your new website for your new business using our new Deluxe Hosting Website Builder service

