
WordPress Toolkit

The WordPress Toolkit, found in your cPanel, gives you an easy-to-read dashboard that allows you to manage all of your WordPress installs. From here, you can see if your installations, plugins, and themes are up-to-date. Keeping your WordPress up to date is the best protection against hacks.
You can also use the toolkit to create back ups and staging sites to help maintain your WordPress websites. Whether you have many WordPress sites, or even only the one, the WordPress Toolkit can help keep you safe and organized.
Here is a quick guide on the WordPress Toolkit and how to use it.
Accessing the WordPress Toolkit
The WordPress Toolkit can be found in your cPanel account. To access the toolkit, first you will need to log into your cPanel. You can find a guide on how to access your cPanel here.

Once you are logged into your cPanel, scroll down to the Domains section and click on the WordPress Toolkit app.
The WordPress Toolkit Homepage
Now that you have loaded your WordPress Toolkit, you will be at the apps homepage. This page will look different, depending on whether you already have any WordPress websites set up in the app.

If you do not have any WordPress sites set up in your WordPress Toolkit, you will see the wizard that will allow you to either create a new WordPress site, or scan for an existing WordPress site to import. Importing your existing WordPress site will allow you to manage your site in the WordPress Toolkit, even if you did not build it with this tool.
Click the Install WordPress button to begin creating your WordPress installation. This will open the WordPress installation wizard.
If you already have a WordPress installation, clicking on the Scan button will have the app search your folders for WordPress installations. If it finds any, it will add it to your list of WordPress sites.

Once you have either scanned and imported a WordPress site, or created a new one, this page will show you a summery of all of your WordPress sites. From here, you will be able to manage your WordPress installations.
Creating a WordPress Site
Clicking on either the Install or Install WordPress buttons will start the WordPress installation wizard. This will guide you through the steps of creating your new site. The script will take care of downloading the files and creating the database for you.

This section is divided into four sections, with two hidden by default. While you will need to edit the information in the first two sections, you can leave the other two at their default settings. You will be able to customize any of these settings later if desired.
General
Here is where you will set up your new website address and location. You can also give your new site a Title, or use a temporary one that the script will generate for you.
You can also choose your Plugin set (in you set any up yet), your default language and your WordPress version.

WordPress Administrator
In this section you will set up your WordPress Administrator account. This account will have access to your entire WordPress installations, so it is VERY important that this account remains safe and secure.

Database
Here, you can customize the setting of your WordPress database. These options are completely optional, as the script will create secure, randomized credentials for you.

Automatic Update Settings
In this section, you will be able to customize your automatic updates, if you choose to use them.
While allowing the script to keep your site up-to-date can definitely help keep your site safe and secure, it can cause your site to break if any of your plugins or your theme becomes incompatible with the new version. If you use a lot of plugins, or any older or custom ones, you may want to turn this option off. This will mean that it will be up to you to check your site from time to time to ensure that it remains active and safe.

Once you have all of your options selected and entered, you can now click Install. The script will now create the database and install your WordPress site in the chosen folder. Once the installation completes, you will have the option to go directly to the plugin installation section, or you can go back to the summery screen.
Congratulations!! You now have a WordPress website. Now you can start adding your theme, plugins and start building your site.
Managing Your WordPress Sites
Now that you have your WordPress site created or imported to the toolkit, you can use this interface to manage your sites. From here, you can add, remove or update your themes, plugins and your WordPress installation. There are also several other management options available at the summery page.

There is a lot of information on this page, as well as many management options, so we will divide it up into sections. There are also four tabs that also contain many options.
Top menu bar

Along the top, you will see the main menu bar. This is what shows when you have the site hidden from the summery view, but contains several controls.
From left to right, you have:
Left side bar

The side bar contains a thumbnail of your websites home page, as well as links to Log In to the WordPress back end, or Setup the admin account.
You will also see the account owner and the domain.
Main section

This section contains the bulk of the management options for your WordPress site. This section has the Site Title at the top, that you can edit from this field, and four tabs worth of options.
Main section tabs
Along the top of this tab, you will see several site management options.
- File Manager
- link to your cPanel File Manager
- Copy Data
- use this to copy this installation to another installation in your WordPress Toolkit
- Clone
- create a copy of the installation and install it in a subdomain
- great for creating a staging site
- Back Up / Restore
- create a backup of the WordPress site or restore from a previously created backup
- Logs
- view the installation logs
We will provide more information on these options below.
Status
In this section, you will see a run down of your website status
- WordPress
- your WordPress version
- Plugins
- the status of your plugins
- Themes
- the status of your installed themes
- Security
- any security issues present
- PHP
- your server PHP version
- SSL/TLS
- the currently installed SSL certificate issuer
Tools
These are some advanced tools for managing your site
- Search engine indexing
- if your site is not completed yet, disable this to stop search engines from indexing your site
- Debugging
- enables debugging messages on your WordPress site
- debugging is disabled by default
- Take over wp-cron.php
- advanced option to control the WordPress cron
- Enable hotlink protection
- enable to prevent other sites from displaying, linking or embedding your files (usually images)
- enable if you are having bandwidth issues
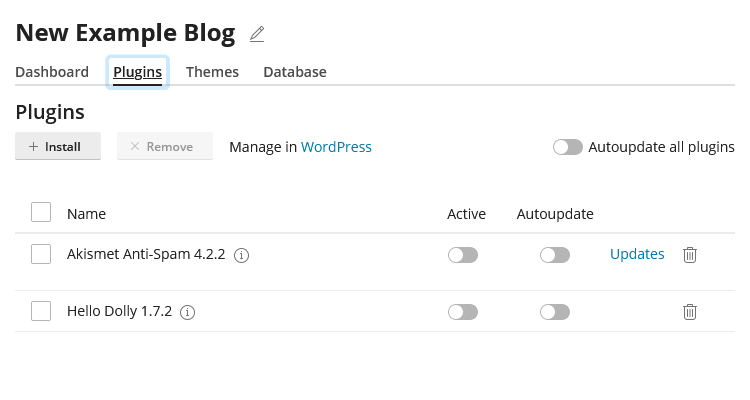
In this tab, you can manage all of your WordPress plugins.
In a glance, you can see if your plugins are out of date and can set them to Autoupdate.
Each plugin will show a toggle as to its Active state, Autoupdate state, a link to force update the plugin and the option to delete the plugin.
Keeping your plugins up to date is the best defense against security threats.
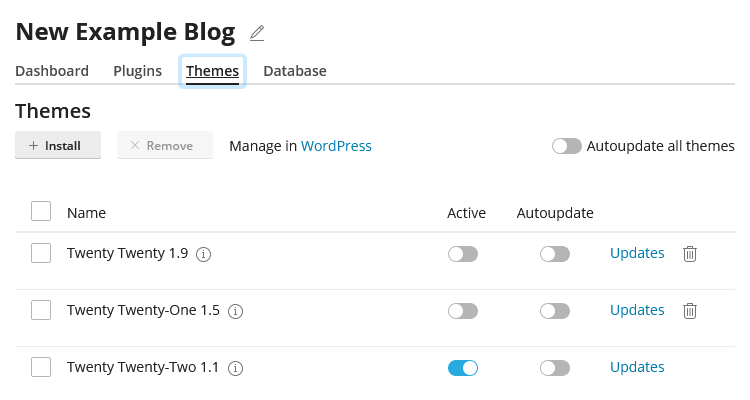
In this tab, you can manage all of your installed Themes.
You will see a list of all of your currently installed themes with an option to set them to active (you can only have one active at a time), toggle the AutoUpdate status, force update or delete the theme.
You can also install new themes by clicking on the + Install button,
Here, you can update your database settings for your WordPress installation. The only time you would need to update this is if you suspect your database has been compromised.
You can also update your username and table prefix. Again, you most likely will never need to do this.
Bottom menu bar
Finally, at the bottom of this section, you will see the bottom menu bar. Here you will see more links and options.
Once you have all of your options selected and entered, you can now click Install. The script will now create the database and install your WordPress site in the chosen folder. Once the installation completes, you will have the option to go directly to the plugin installation section, or you can go back to the summery screen.
Congratulations!! You now have a WordPress website. Now you can start adding your theme, plugins and start building your site.
If you are still having issues, and need further support, please reach out to our support team using any of these methods.
Recent Articles
What is Cloud Hosting
You probably have heard a lot of buzz around the internet about "the cloud". But what is the cloud that everyone is so excited about, and what does it have to do with your [...]
Website Builder Contact Forms
A Contact Form can be a powerful online tool to help build your business client base and add new customers.
Website Builder Site Settings
Use the Site Settings section of your Website Builder service to customize your new website.
Create your new website with Website Builder
Create your new website for your new business using our new Deluxe Hosting Website Builder service