
cPanel File Manager

Your cPanel File Manager can be used to upload your website files, however, you will probably still wish to use an FTP Account to upload your website.
So why would you use the built-in file manager? There are several occasions where the file manager is more convenient than logging into your FTP client.
The cPanel File Manager is great for doing minor edits or updates to your websites using the HTML editor, provided that your website is built in html. It is also a good tool to use to create a compressed back up file your website files and download then to your local computer.
Here is a guide on how to use your cPanel File Manager.
Accessing the cPanel File Manager
To access the File Manager, first you will need to log into your cPanel. You can find a guide on how to access your cPanel here.

Once you are logged into your cPanel, scroll down to the Files section and click on the File Manager.
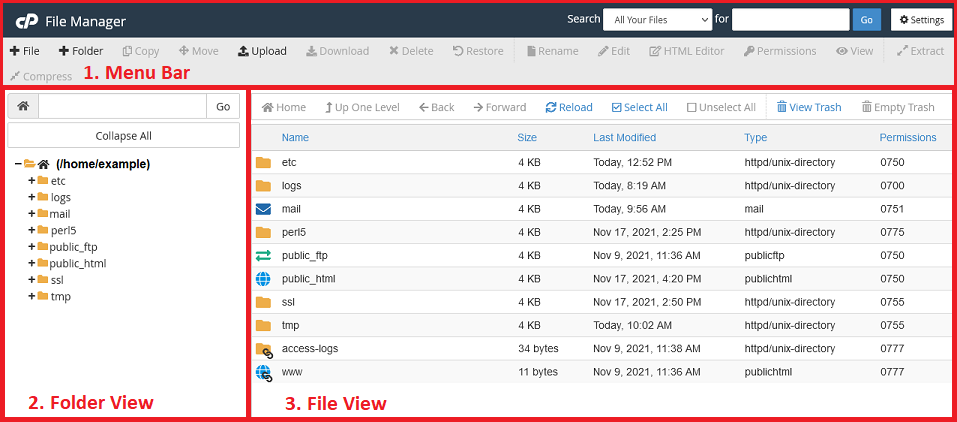
The cPanel File Manager contains a lot of information regarding your files, as well as several tools. To help explain what you can do with the File Manager, we will divide it up into three sections.
Menu Bar

At the top, you will see the main title bar. In the top right-hand corner, you will see a search box, as well as the Settings.
The Preferences section will allow you to customize a few parts of your File Manager.
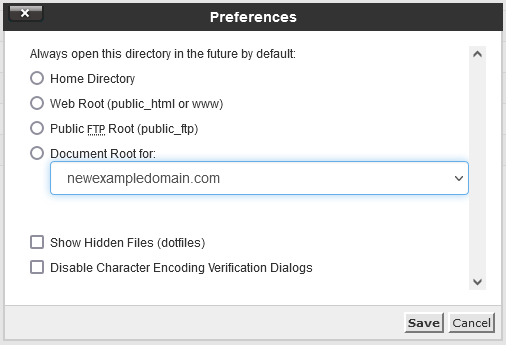
The top part will allow you to choose the default folder for the File Manager
The bottom part will have check boxes for additional options.
Below the Title bar, you will see the main menu bar. This contains most of the advanced tools for your File Manager.
Folder View

The folder view is just that, the directory tree. You can use this folder tree to navigate your through your directory structure.
There is a search box at the top where you can access your folder directly by typing it in. Enter in the name of the folder and click “Go” to open the folder in the File View.
You can also use the tree below to navigate your file structure. Click on the “+” icon to the left any folder to expand it and view their sub-folders. Clicking on the folder will open it in the File View.
Clicking on the Collapse All button will close all of the expanded folders.
File View

The File View is the main part of your cPanel File Manager, where you can manage all of your website files. From here you can move, copy and delete files, or even create archives or zips of your files. You can manage your file permissions, view and even edit your text based files.
Navigation Menu
At the top of the File View, you will find the Navigation bar. Here you have several option here for managing your files. You will also see the View Trash and Empty Trash buttons that functions like the recycle bin on your computer. Any files deleted are moved here so you can recover them if necessary.
Files
In this view, you can see the files in the currently selected folder. You can see the files Name, Size, when it was Last Modified, file Type and the current Permissions settings. You can select folders using the Folder View to the left, or you can open folders in the File View by double-clicking on them, just as you would in any file manager.
In this manager, you can also select files like you would in most file managers:
- you can click on any file to select it
- you can select many files by left-clicking and dragging over the files
- you can add to the selection holding Shift or Control and clicking on files
- Shift will select all files between clicks
- Control will toggle individual files
Right-click Menu
You can also right-click on any file to get a context menu for the file. This menu will vary depending on the type of file, but there is an example for a common text file.

If you are still having issues, and need further support, please reach out to our support team using any of these methods.
Recent Articles
What is Cloud Hosting
You probably have heard a lot of buzz around the internet about "the cloud". But what is the cloud that everyone is so excited about, and what does it have to do with your [...]
Website Builder Contact Forms
A Contact Form can be a powerful online tool to help build your business client base and add new customers.
Website Builder Site Settings
Use the Site Settings section of your Website Builder service to customize your new website.
Create your new website with Website Builder
Create your new website for your new business using our new Deluxe Hosting Website Builder service