FTP Clients – WinSCP
WinSCP is another popular FTP client for Windows 10/11. While easy to use, it includes all of the features that you would expect from an FTP client, including support for other protocols, including FTP, FTPS, SCP, SFTP, WebDAV or S3. It also has a system for saving and securing your account usernames and passwords.
Here is how to download and install WinSCP on your Windows machine and use it to connect to your cPanel based Deluxe Hosting web hosting services.
Before you start
Before you can start using WinSCP to upload your web site files, there are a few things that you will need first.
First, you will need to create an FTP account in your cPanel. You can find information on creating FTP accounts here. Make sure you know your FTP settings:
- Host name
- Username
- Password
Once you have your FTP account all set up, you will now need to download and install WinSCP. See the section below for the installation method.
Now that you have your FTP client and your account all set up, you will need files to upload. While we can assist in many facets of your web hosting services, unfortunately this is one part we cannot assist you with (for now). There are many apps and programs available to help you build your web site. You can even search your local classifieds to find someone who can create a website for you for a reasonable price.
Download, Install and Set up WinSCP
Your Content Goes Here
In order to use WinSCP to upload your files to our servers, you will first need to install the app and then set it up with your FTP account settings.
Download and install WinSCP
First, you will need to download the WinSCP client installer. This can be found at their website:
https://winscp.net/eng/index.php
Click on the green Download Now button to begin downloading the installer to your local machine. Now choose the latest version and click the button to download the app installer.
Once downloaded, find the file and run the installer. The default settings should all be fine. After the app is installed, open the app to begin setting it up to connect to your web server.
Set up WinSCP

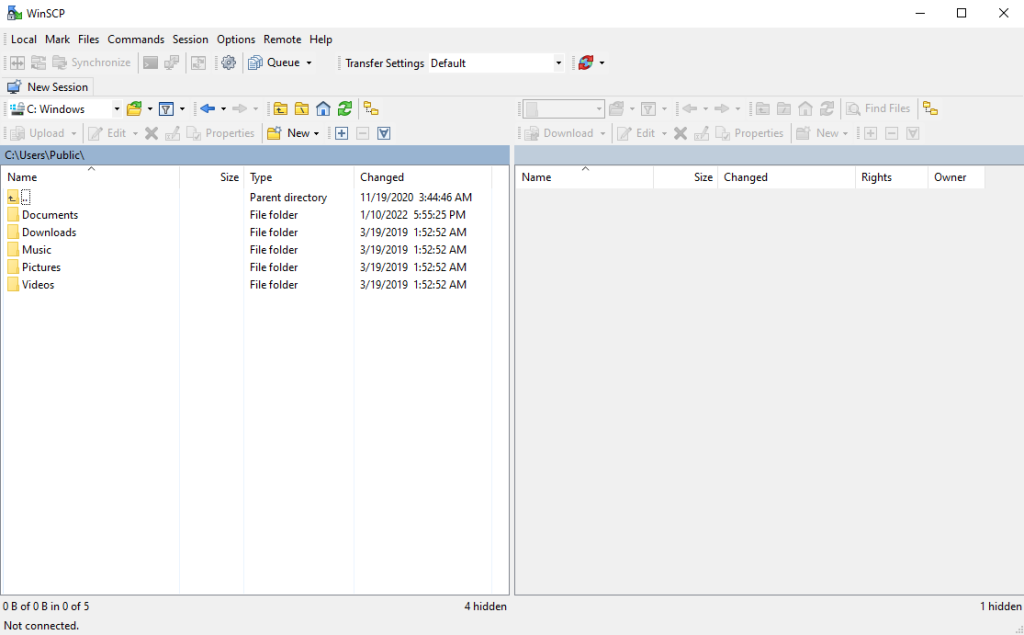
One you have WinSCP installed, run the app to get started. Once the app loads, you will be looking at the main page.
To start a new connection, click on New Session. This is found in the upper left of the screen, or in the Session menu in the upper menu bar. This will open the New Session window.

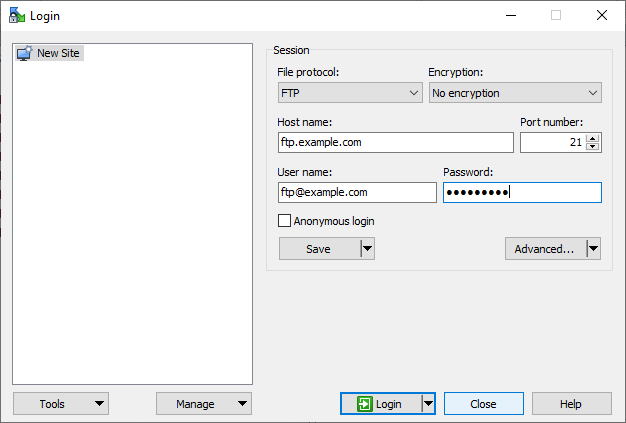
In this window, you can enter your new FTP login information and save the settings for later. While this is not required, it can be very useful if you have several FTP accounts that you manage.
First click on New Site to create a new entry. Here you will be asked to enter your account information:
- File Protocol
- in most cases, this will be FTP or SFTP
- Encryption
- will be set to No Encryption for FTP and TLS/SSL Explicit Encryption for SFTP
- Host Nam
- enter your server name, this can be your domain name, the server domain name or the server IP
- Port Number
- typically set to port 21, but will auto populate with the other settings
- User Name
- your FTP account username
- Password
- the password you set when setting up your FTP account
- Anonymous Login
- should be left unchecked as most ftp servers have anonymous logins disabled
Once you have all of your information entered, you can either click on Login to connect to the server and begin your FTP session, or you may choose Save to save this connection for future use.
If you choose Save, you will be asked to enter a name for the connection and what folder you put it in, if you have some created already.
You can get WinSCP to save the password as well. This will require that you set up a master password for WinSCP that will need to be entered each time you log into one of your saved connections.
Lastly, you can choose if you would like a shortcut for the connect to be placed on your desktop.
Using WinSCP to transfer files

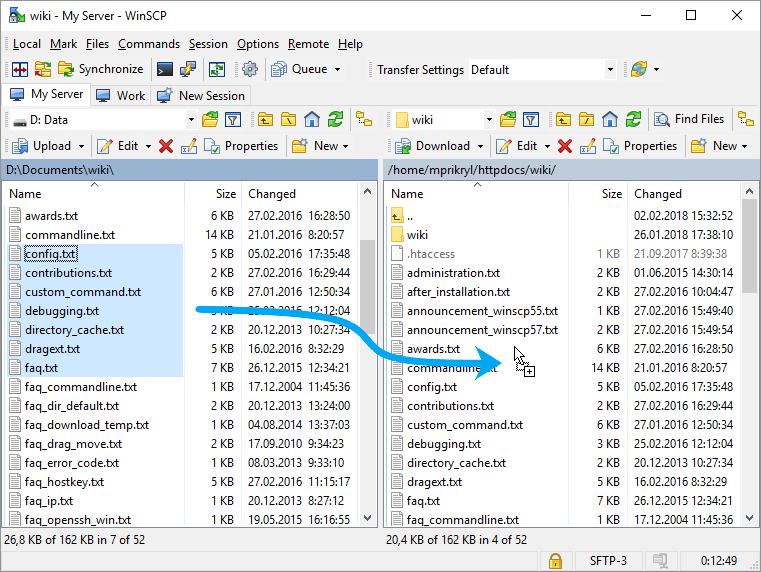
Once you are connected to your FTP server, you can start transferring your website files. Transferring files with WinSCP is as simple as transferring files in your Windows Explorer.
On the left-hand side of the screen, you will see the files on your local machine (your computer). You can navigate your files and folders just i you would in Windows.
You can upload any folders or files by either right clicking on them and choosing Upload or by dragging them to the right-hand side.
On the right-hand side, you will see the files and folders of the remote server (the server you connected to). Just like the left-hand side, you can navigate the files and folders on your FTP server just as you would on Windows Explorer.
If you would like to download a folder or file, you can do so by either right-clicking the file or folder and selecting Download, or by dragging the file or folder to the left-hand side.
You can have several sessions open at once. You will see tabs at the top of the screen with the name of the server on each tab and the New Session tab on the right-hand side. Click New Session to start a new FTP connection. This will bring up the same New Session window as before, with the same options to enter a new connection, or connect with one of your currently saved connections.
If you are still having issues, and need further support, please reach out to our support team using any of these methods.
Recent Articles
What is Cloud Hosting
You probably have heard a lot of buzz around the internet about "the cloud". But what is the cloud that everyone is so excited about, and what does it have to do with your [...]
Website Builder Contact Forms
A Contact Form can be a powerful online tool to help build your business client base and add new customers.
Website Builder Site Settings
Use the Site Settings section of your Website Builder service to customize your new website.
Create your new website with Website Builder
Create your new website for your new business using our new Deluxe Hosting Website Builder service

