Managing Addon Domains in cPanel
You can use your cPanel to manage the websites and emails of all of your domains. This will save you both money and time by keeping all of your domain management tasks in the same place. You can add more domains to your Deluxe Hosting hosting plan, depending on which service you have purchased. Here is a guide on how to manage your Addon Domains in cPanel.
Accessing your Addon Domains
In order to add or manage your Addon domains, you will need to log into your cPanel. You can find a guide on how to access your cPanel here.

Once you are logged into your cPanel, navigate to the Domains section. Click on the Addon Domains app to get started.

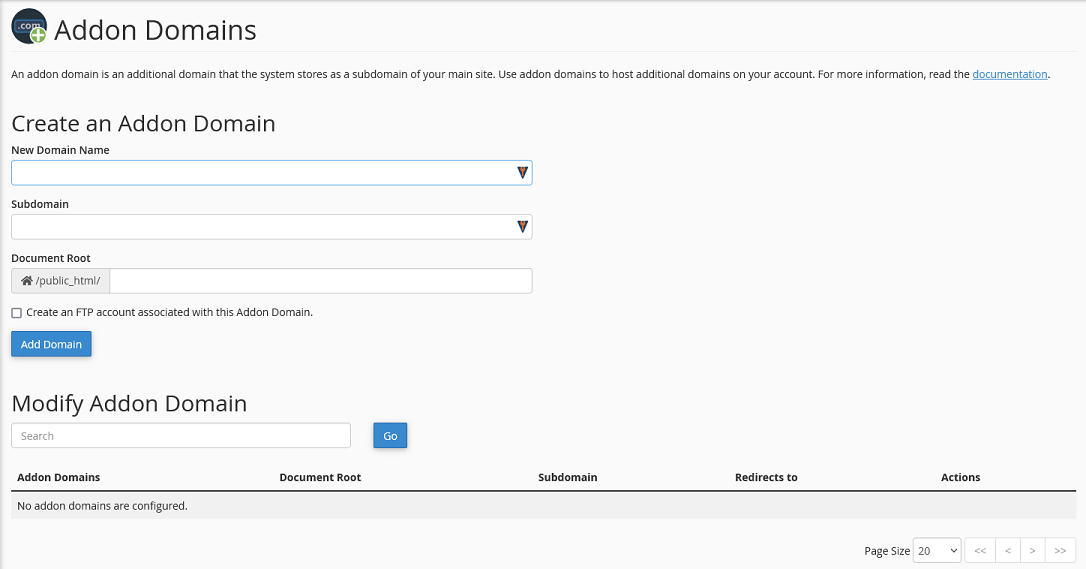
Once the app loads, you should see the screen is divided into two sections.
You will also see a list of any previously added Addon domains.
Create an Addon Domain
To create a new Addon Domain, all you need to do is enter the information at the top of the screen at the top of the screen.

- New Domain Name
- enter the full domain name here
- Subdomain
- cPanel will automatically create a subdomain of your primary domain to manage your Addon domain
- this field will auto-populate once the addon domain name is entered
- Document Root
- this is the folder that will contain the website files for this Addon domain
- will auto-populate once the addon domain name is entered
- by default, this location will be a subfolder in the main document root folder
- Example: /public_html/[addon domain name]
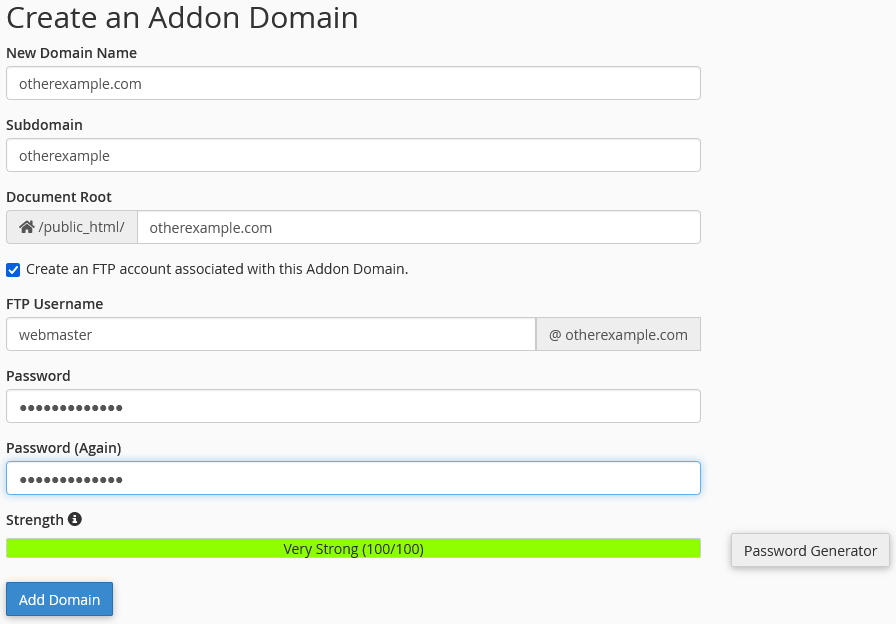
- Create an FTP account associated with this Addon Domain
- check this to add an FTP account for this domain
- if you check this option, you will be asked for the FTP account credentials
-
- FTP Username
- the username for the FTP account
- Password
- the FTP account password
- Password (Again)
- confirm the password
- Strength
- a score from 0-100 for the password strength
- the password will need to meet the minimum threshold set by the server
- FTP Username
After you enter the domain name, and click on the other fields will auto-populate once you click on any other field. You should not need to change these settings.
Once you are happy with the settings, click Add Domain to finish. cPanel will now create the Zone File for the domain, as well as the document root folder.
Modify Addon Domain
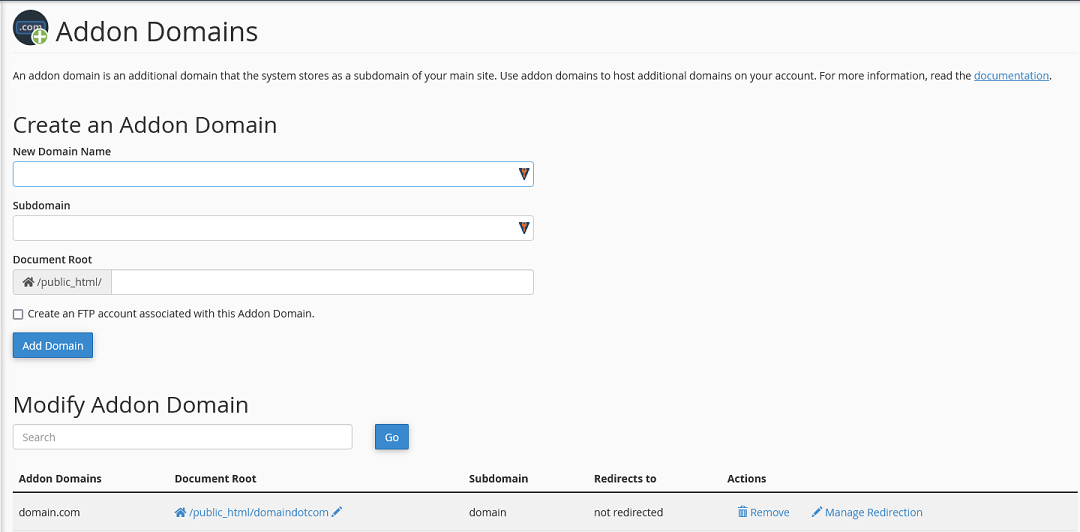
If you need to modify an Addon domain, you can do this from this App as well. You should see a list of all of your Addon domains at the bottom of the screen under the Modify Addon Domain title.

If you have several Addon domains, you can use the Search bar to find the domain in question.
Each domain will have several columns of information.
- Addon Domains
- this is the domain name for the Addon domain
- cannot be changed
- Document Root
- this is the folder that the website files are stored in
- clicking on the folder name will access this folder
- you can change this folder by clicking on the Pencil icon
- Subdomain
- this is the subdomain that cPanel assigned to this domain for management purposes
- cannot be changed
- Redirects to
- shows what domain this Addon domain redirect to, if any
- Actions
- Remove
- delete the Addon domain and the Zone file
- this cannot be reversed
- Manage Redirection
- add or modify the domain redirect
- Remove
Propagation
Note: It can take up to 24 hours for any changes or updates to your domain name and DNS to fully propagate and take effect. During this time your website traffic and email may be disrupted. If you want to minimize this disruption to your website traffic and email, before making any other changes to your name servers, lower your TTL with your current registrar. Once you lower your TTL, wait 24 hours, and then update your name servers. The change should now happen more quickly.
There are several online tools that you can use to test propagation, such as DNSChecker and Geopeeker.
This process typically completes within four to six hours, but allow 24 hours before the records are fully propagated.
If you are still having issues, and need further support, please reach out to our support team using any of these methods.
Recent Articles
What is Cloud Hosting
You probably have heard a lot of buzz around the internet about "the cloud". But what is the cloud that everyone is so excited about, and what does it have to do with your [...]
Website Builder Contact Forms
A Contact Form can be a powerful online tool to help build your business client base and add new customers.
Website Builder Site Settings
Use the Site Settings section of your Website Builder service to customize your new website.
Create your new website with Website Builder
Create your new website for your new business using our new Deluxe Hosting Website Builder service

