Managing your Subdomains in cPanel
Subdomains are a powerful tool that will allow you to get the most of your domain name. Subdomains use a prefix in conjunction with the domain name to create a new address on the internet, using the same domain name. This can be helpful if, for example, you have a blog, or any other type of website that uses a domain name. Here is a guide to creating and managing your subdomains.
What is a Subdomain?
A subdomain is a prefix of your existing domain that you can use to for additional websites or services.
For example, lets say your business domain is example.com. If you wanted to create a blog to go with your main website, you could create the subdomain blog.example.com. You can then create a blog using that subdomain with out affecting your main site.
Now, because your business is expanding, you decide to create a new online store. Why not use store.example.com? You can easily link your customers between all of your websites.
Subdomains are great at keeping the different parts of your website compartmentalized, so you can stay organized and up to date.
The Subdomains app in cPanel is used for managing your subdomains.
How to I access the Subdomains section of cPanel?
In order to create or manage your subdomains, you will need to log into your cPanel. You can find a guide on how to access your cPanel here.

Scroll down to the Domains section of cPanel and click on the Subdomains app.

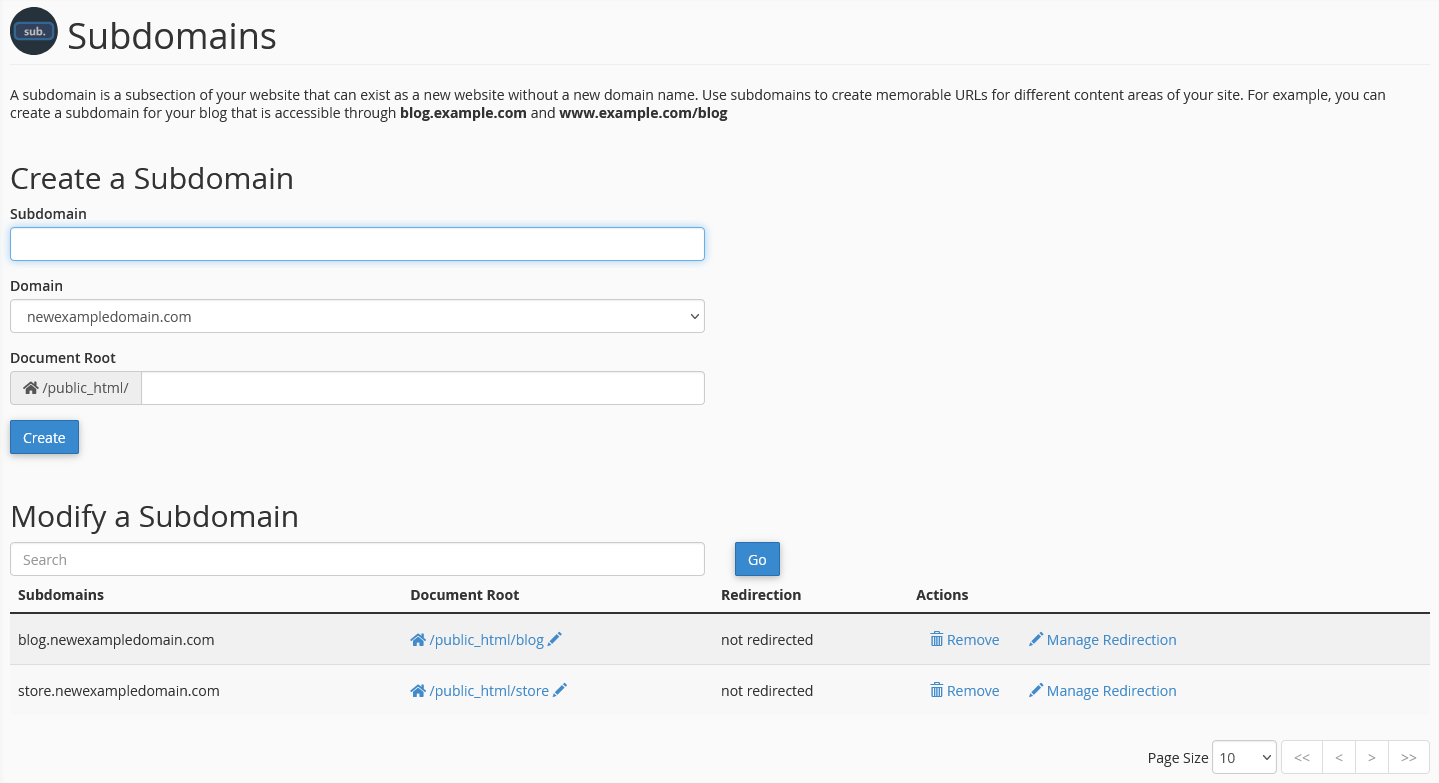
Once you are loaded into the Subdomain app, you should see two sections.
The top section where you add new subdomains
The bottom section were you can manage your existing subdomains
Create a Subdomain
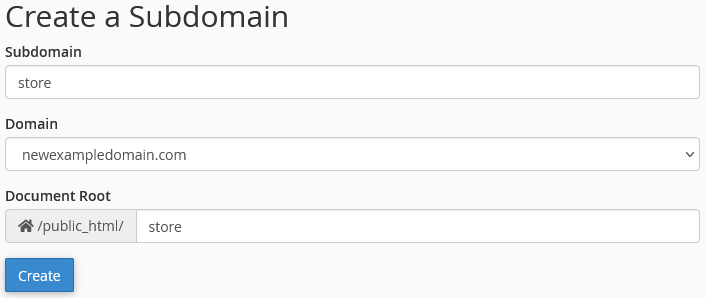
To create a subdomain, you can enter the desired information in the top part of the screen under Create a Subdomain.

- Subdomain
- this is the prefix for the subdomain (the part before your domain name)
- you only need to enter the prefix, you will choose the domain below
- Domain
- here you can choose which domain you want to use for the main part of the domain
- it will choose your primary domain by default
- choose any addon domain from the drop-down list
- Document Root
- this is the directory where your website files will be kept
- by default will be a subfolder of the primary domain document root
- /public_html/[subdomain]
Once you have all of the fields filled in, click Create to add the subdomain. This will also create a zone file for your new subdomain.
Modify a Subdomain
At the bottom part of the Subdomains app, you will see all of your existing subdomains. You will see the settings for managing your subdomains here.

- Subdomains
- this is the full subdomain, including the root domain (blog.example.com)
- this cannot be changed
- Document Root
- this is the folder where the site files will be stored
- clicking on the path will open the file manager
- the pencil icon will allow you to edit the document root path
- Redirection
- this will show to current redirect for this domain, if one is set
- you cannot update it here
- Actions
- Remove
- this will delete the subdomain and zone file, but not the files
- this cannot be undone, you will need to recreate the subdomain from scratch
- Mange Redirection
- here you can set the subdomain to redirect to a different website
- enter the domain name and click Save
- Remove
Search for a subdomain
If you have several domain names, you can use the search box find your subdomain you wish to edit. You can search by domain name to fine all of the subdomains connected to that domain. Enter your search criteria and click Go.
Modify the document root for a subdomain
To modify the document root for a subdomain, perform the following steps:
- Click the pencil icon that corresponds to the subdomain that you want to manage.
- Enter the new file path that you want to use as the document root .
- Click Change.
Enable or disable subdomain redirection
To enable or disable redirection of a subdomain, perform the following steps:
- Click the Manage Redirection link that corresponds to the subdomain that you wish to manage.
- If you wish to redirect the subdomain, enter the link to which you want to redirect the subdomain in the available text box.
- To disable the redirect, click Disable Redirection.
- Click Save.
Remove a subdomain
To remove an existing subdomain, perform the following steps:
- Click the Remove link that corresponds to the subdomain that you want to remove.
- Click Yes to confirm that you want to remove the subdomain.
- To keep the subdomain, click No.
Propagation
Note: It can take up to 24 hours for any changes or updates to your domain name and DNS to fully propagate and take effect. During this time your website traffic and email may be disrupted. If you want to minimize this disruption to your website traffic and email, before making any other changes to your name servers, lower your TTL with your current registrar. Once you lower your TTL, wait 24 hours, and then update your name servers. The change should now happen more quickly.
There are several online tools that you can use to test propagation, such as DNSChecker and Geopeeker.
This process typically completes within four to six hours, but allow 24 hours before the records are fully propagated.
If you are still having issues, and need further support, please reach out to our support team using any of these methods.
Recent Articles
What is Cloud Hosting
You probably have heard a lot of buzz around the internet about "the cloud". But what is the cloud that everyone is so excited about, and what does it have to do with your [...]
Website Builder Contact Forms
A Contact Form can be a powerful online tool to help build your business client base and add new customers.
Website Builder Site Settings
Use the Site Settings section of your Website Builder service to customize your new website.
Create your new website with Website Builder
Create your new website for your new business using our new Deluxe Hosting Website Builder service

